


Accessing AMS Data
- Create Simple Queue Service – SQS queue
- Create a Subscription for the Seller through the API
- Check Subscriptions via API
- Confirm Subscription
- Read Message data from SQS
- Automate AMS Registration and SQS Subscription in PHP Laravel
Create Simple Queue Service – SQS queue
(Refer: https://advertising.amazon.com/API/docs/en-us/amazon-marketing-stream/cloud-formation )
- Login to AWS Console
- Change region to Ireland (as we need to get data from EU endpoints)
- Search service Cloud Formation
- Create a new Stack from new resources
- Select Prepare template ->Template is ready
- Specify template -> Upload a template file -> get this file from : https://github.com/amzn/ads-advanced-tools-docs/blob/main/amazon_marketing_stream/Stream_SQS%20_CF_Template.yaml (No need to change any details from the yaml file)
- Enter Stack Name: AdAce-Stack-MS-sp-conversion-EU
- Choose Parameters (StreamDatasetId: sp-conversion,StreamDestinationQueueName: AdAce-MS-sp-conversion-EU, StreamRealm: EU ) (Refer: https://advertising.amazon.com/API/docs/en-us/amazon-marketing-stream/data-guide ) – We need different stacks if we need different datasets or from different regions.
- Submit Stack for creation. Wait for a while to get the stack status as “CREATE_COMPLETE”
- Check the SQS Queue console to verify the newly created queue from the cloud formation stack. (Ref: Figure # 1)
- Click on the newly created queue.
- Check the Access policy – it will be created automatically.
- Copy the ARN from the Details section
Create a Subscription for the Seller through the API
End Point: {{api_url}}/streams/subscriptions
Header Info:
Content-Type:application/vnd.MarketingStreamSubscriptions.StreamSubscriptionResource.v1.0+json
Amazon-Advertising-API-ClientId:{{client_id}}
Amazon-Advertising-API-Scope:{{profileId}}
Authorization:Bearer {{access_token}}
Body Info:
{
"clientRequestToken": "123456789xyz1234567ShreeNag001",
"dataSetId": "sp-conversion",
"notes": "Advertiser Shree Nagnechi Arts sp-conversion subscription",
"destinationArn": "arn:aws:sqs:eu-west-1:218684966818:AdAce-MS-sp-conversion-EU"
}- clientRequestToken – We can give any 22 digit codes
- dataSetId – is the report type
- notes – any detailed description can be provided
- destinationArn – ARN of newly created SQS to be provided – which we can copy from the SQS Detail section.
The response will be:
{
"clientRequestToken": "123456789xyz1234567ShreeNag001",
"subscriptionId": "amzn1.fead.cs1.skjfYbJWQwqJ-gGYSeVEDw"
}
Subscription status flow
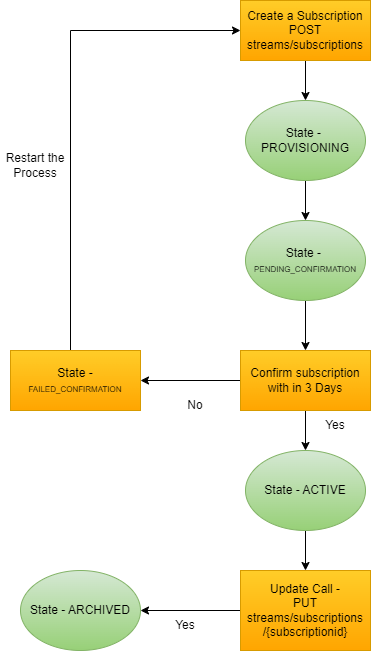
Retrieve Subscription Status via API
- End Point: {{api_url}}/streams/subscriptions
- Header Info:
Content-Type:application/vnd.MarketingStreamSubscriptions.StreamSubscriptionResource.v1.0+json

Amazon-Advertising-API-ClientId:{{client_id}}

Amazon-Advertising-API-Scope:{{profileId}}

Authorization:Bearer {{access_token}}- Body Info: Empty
- The response will be:
{
            "createdDate": "2023-05-04T10:51:07.336Z",
            "dataSetId": "sp-conversion",
            "destinationArn": "arn:aws:sqs:eu-west-1:218684966818:AdAce-MS-sp-conversion-EU",
            "notes": "Advertiser Shree Nagnechi Arts sp-conversion subscription",
            "status": "PENDING_CONFIRMATION",
            "subscriptionId": "amzn1.fead.cs1.oQ0qnhbYTyKjtylqYkVKjQ",
            "updatedDate": "2023-05-04T10:51:09.068Z"
}
Note: Initially the status will be “PENDING_CONFIRMATION”
How to Confirm Subscription
- Open SQS Console
- All queues will be listed here.
- Click the Refresh Button – to see the number of Messages Available against each queue.
- Select the newly created queue (ABC-MS-sp-conversion-EU)
- Click on “Send and Receive Messages” from the top bar.
- Click on “Poll for messages” from the “Receive messages” tab
- New messages will list under the “Messages” tab.
- Click on message ID.
- Message details will show in the popup.
- Copy Body Details:
{

  "Type" : "SubscriptionConfirmation",
  "MessageId" : "1179ca04-7ed3-0000-b810-xxxxx",
  "Token" : "xxxxxxxxxxxxxxxxxxxx",
  "TopicArn" : "xxxxxxxxxxxxxxxxxxxxxxxxxxxxxxxxxxxxxxxxx",
  "Message" : "You have chosen to subscribe to the topic xxxxxxxxxxxx:FEADMessageDeliveryTopic-sp-conversion-XXXXX-ENTITY2XXXXXXX.\nTo confirm the subscription, visit the SubscribeURL included in this message.",
  "SubscribeURL" : "https://sns.eu-west-1.amazonaws.com/?Action=ConfirmSubscription&TopicArn=arn:aws:sns:eu-west-1:562877083794:FEADMessageDeliveryTopic-sp-conversion-A21TJRUUN4KGV-ENTITY2K4GCXA3VEWSF&Token=xxxxxxxxxxx",
  "Timestamp" : "2023-05-04T10:51:08.984Z",
  "SignatureVersion" : "1",
  "Signature" : "gJdsXwdwwwdwd==",
  "SigningCertURL" : "https://sns.eu-west-1.amazonaws.com/SimpleNotificationService-56xxxf6fec09bxxxxxxxxx.pem"
}
- Make a GET request to “SubscribeURL” which is included in the above response.
- Check Subscriptions via API and check the status which should be “ACTIVE” – this will take some time (5 mins) to become the status Active
{
            "createdDate": "2023-05-04T10:51:07.336Z",
            "dataSetId": "sp-conversion",
            "destinationArn": "arn:aws:sqs:eu-west-1:218684966818:AdAce-MS-sp-conversion-EU",
            "notes": "Advertiser Shree Nagnechi Arts sp-conversion subscription",
            "status": "ACTIVE",
            "subscriptionId": "amzn1.fead.cs1.oQ0qnhbYTyKjtylqYkVKjQ",
            "updatedDate": "2023-05-04T11:23:11.621Z"
}
Reading Messages – PHP Laravel example
- First, make sure you have installed the AWS SDK for PHP using Composer:
composer require aws/aws-sdk-php- Then, create a new Laravel command using the following command:
php artisan make:command ReadSQSMessage- This will create a new file in the app/Console/Commands directory called ReadAllSQSMessages.php.
In that file, add the following code:
- This command will connect to your AWS SQS queue using the credentials and region specified in your .env file, and read up to 10 messages at a time from the queue. It will then process each message body, delete the message from the queue, and continue reading messages until the queue is empty.
You can run the command by executing the following command in your terminal:
php artisan sqs:read-messageMake sure to replace the values in the env() calls with your own AWS credentials, region, and SQS queue URL.
Automate AMS Registration and SQS Subscription in the application
We have successfully implemented a solution to manage sellers within our application by creating separate SQS queues for each seller and subscribing their respective AMS data to these queues. This approach ensures efficient management and minimizes any potential impact on other sellers’ data.
An important benefit of this setup is that if a queue encounters any issues or becomes blocked for any reason, it will not affect the data flow for other sellers. This segregation provides a higher level of resilience and ensures the continuity of operations.
Furthermore, to remove a specific seller’s AMS data, we have implemented a streamlined process. By simply archiving the subscription and the corresponding queue associated with that seller, we can swiftly remove their data without impacting the information of other sellers.
This robust and scalable solution enables us to efficiently handle a large number of sellers within our application while maintaining data integrity and minimizing disruptions.
To register a seller for receiving AMS Data, we followed the steps outlined below:
- Establish a connection to the SQS Client API. To do this, you will need the region information (currently only Ireland [eu-west-1] is supported) as well as the Amazon Account Access Key and Secret Key.
- Create a new Queue using the createQueue function from the SQS Client API. Provide the desired “QueueName” as a parameter. This function will return a result set from which you can extract the Queue URL and ARN.
- Once the Queue is successfully created and you have obtained the QueueURL, you need to attach an Access policy to the Queue. This can be done using the setQueueAttributes function from the SQS Client API. The policy document details should be provided as a JSON String. You will need to specify which datasets will deliver data to this queue. In our case, it will be “sp-traffic” and “sp-conversions”. It is possible to use one queue to receive data from multiple datasets. The policy document should assign the necessary permissions for these datasets to the queue.
- After the policy document is attached, the queue is ready to receive data. As data is received from the Amazon Ads API, we need to create a data subscription through the Ads API using the Streams API functions.
- Establish a connection to the Ads API.
- Set the profile ID for the seller through the Ads API.
- Create a Stream Subscription by making a POST request to “streams/subscriptions” endpoint, passing the necessary parameters such as the dataset ID and the ARN of the SQS Queue for delivering the data. You can refer to the documentation here: Link to documentation.
- If the subscription is successfully created, a confirmation message will be delivered to the SQS Queue whose ARN was set as the delivery point.
- Read messages from the SQS queue using the URL of the Queue.
- Extract the SubscribeURL from the message and make a GET HTTP request to that URL to confirm the subscription. You can refer to the documentation here: Link to documentation.
- If the request is successful, the queue will start receiving AMS data during the next broadcasting time.
We have provisioned this registration process as a background job so that the application users are not required to wait for completing the process. A seller will automatically get registered to receive AMS data at the time of creation. Similarly, if a seller is deleted then his subscriptions and queue will also get deleted. We also created functions for bulk registration and bulk unregistration for receiving data for existing sellers and to avoid manual registration by taking individual sellers.