


Introduction
Push notifications are essential for engaging users and keeping them informed about important updates in mobile application. Firebase Cloud Messaging (FCM) provides a reliable, cross-platform messaging solution that allows you to send notifications to iOS and Android devices for free.
Enabling push notifications in an iOS app not only enhances user engagement but also aligns with Apple’s recommended best practices. Including this functionality ensures that your app remains responsive, timely, and more likely to meet Apple’s review expectations, as push notifications are considered a valuable tool for delivering important updates and improving the overall user experience.
This is Part 1 of a two-part guide covering the complete setup and configuration process for integrating Firebase push notifications into a Flutter iOS project.
Prerequisites
Before we begin, ensure you have:
– Flutter SDK installed (version 3.0 or higher)
– Xcode installed with iOS development tools
– An Apple Developer account
– A Firebase project created in the Firebase Console
– Basic knowledge of Flutter and Dart
Step 1: Firebase Project Setup
1.1 Create a Firebase Project
1. Go to the [Firebase Console](https://console.firebase.google.com/)
2. Click “Create a project” or select an existing project
3. Follow the setup wizard to configure the project
4. Enable Google Analytics (optional but recommended)
1.2 Add iOS App to Firebase Project
1. In the Firebase Console, click “Add app” and select iOS
2. Enter the iOS bundle ID (found in `ios/Runner.xcodeproj`)
3. Provide an app nickname and App Store ID (optional)
4. Download the `GoogleService-Info.plist` file
5. Important: This plist file contains all the configuration values needed for Firebase
Step 2: Configure the Flutter Project
2.1 Add Dependencies
Add the following dependencies to `pubspec.yaml`:
```yaml
dependencies:

  flutter:

    sdk: flutter

  firebase_core: ^2.24.2

  firebase_messaging: ^14.7.10

  flutter_local_notifications: ^16.3.2

dev_dependencies:

  flutter_test:

    sdk: flutter
```
Run `flutter pub get` to install the dependencies.
2.2 iOS Configuration
1. Add GoogleService-Info.plist:
– Open `ios/Runner.xcworkspace` in Xcode
– Drag the downloaded `GoogleService-Info.plist` file into the Runner folder
– Ensure “Copy items if needed” is checked
2. Configure App Delegate:
Update `ios/Runner/AppDelegate.swift`:
```swift

import UIKit

import Flutter

import Firebase

import UserNotifications

@UIApplicationMain

@objc class AppDelegate: FlutterAppDelegate {

  override func application(

    _ application: UIApplication,

    didFinishLaunchingWithOptions launchOptions: [UIApplication.LaunchOptionsKey: Any]?

  ) -> Bool {

    FirebaseApp.configure()

    if available(iOS 10.0, *) {

      UNUserNotificationCenter.current().delegate = self as UNUserNotificationCenterDelegate

    }

   GeneratedPluginRegistrant.register(with: self)

    return super.application(application, didFinishLaunchingWithOptions: launchOptions)

  }

}

```
3. Enable Push Notifications Capability:
– In Xcode, select the project target
– Go to “Signing & Capabilities”
– Click “+ Capability” and add “Push Notifications”
– Add “Background Modes” and enable “Background processing” and “Remote notifications”
Step 3: APNs Configuration
3.1 Create APNs Key
1. Go to [Apple Developer Console](https://developer.apple.com/account/)
2. Navigate to “Certificates, Identifiers & Profiles”
3. Click “Keys” and create a new key
4. Enable “Apple Push Notifications service (APNs)”
5. Download the `.p8` key file
3.2 Upload APNs Key to Firebase
1. In Firebase Console, go to Project Settings
2. Select the “Cloud Messaging” tab
3. In the iOS app configuration section, upload the APNs key
4. Enter Key ID and Team ID
Step 4: Firebase Options Configuration
4.1 Initialize Firebase
Option 1: Using FlutterFire CLI (Recommended)
```bash

flutter pub global activate flutterfire_cli

flutterfire configure

```
This automatically generates `lib/firebase_options.dart` with correct values.
Option 2: Manual Configuration
Get values from `GoogleService-Info.plist` file:
```dart

import 'package:firebase_core/firebase_core.dart';

class DefaultFirebaseOptions {

  static FirebaseOptions get currentPlatform {

    return ios;

  }

 static const FirebaseOptions ios = FirebaseOptions(

    apiKey: 'AIzaSyC...', // API_KEY from plist

    appId: '1:123456789:ios:abcdef', // GOOGLE_APP_ID from plist

    messagingSenderId: '123456789', // GCM_SENDER_ID from plist

    projectId: 'your-project-id', // PROJECT_ID from plist

    storageBucket: 'your-project.appspot.com', // STORAGE_BUCKET from plist

    iosBundleId: 'com.example.app', // BUNDLE_ID from plist

  );

}

```
Where to find these values:
– Open `GoogleService-Info.plist` in a text editor
– Find the corresponding keys:
– `API_KEY` → apiKey
– `GOOGLE_APP_ID` → appId
– `GCM_SENDER_ID` → messagingSenderId
– `PROJECT_ID` → projectId
– `STORAGE_BUCKET` → storageBucket
– `BUNDLE_ID` → iosBundleId
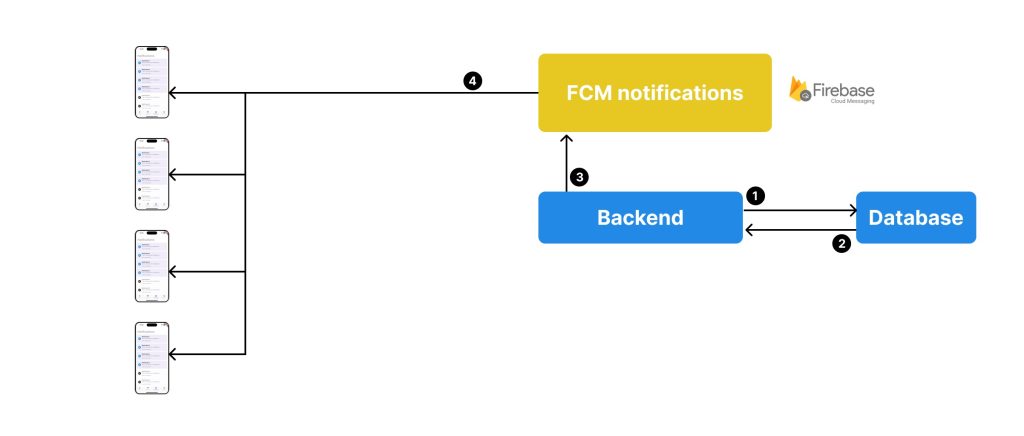
Step 5: Server-Side Configuration (Laravel)
To send notifications from the backend, we use Firebase Cloud Messaging (FCM) HTTP v1 API.
5.1 Get Firebase Service Account Key
1. In Firebase Console, go to Project Settings
2. Click “Service accounts” tab
3. Click “Generate new private key”
4. Download the JSON file (e.g., `firebase-service-account.json`)
5. Important: This is different from `GoogleService-Info.plist` – this is for server authentication
5.2 Laravel
Install Google API Client Library for PHP:
```
composer require google/apiclient
```
Store service account file:
```
storage/app/firebase/firebase-service-account.json
```
Add to .env:
```env

FIREBASE_PROJECT_ID=your-project-id

FIREBASE_CREDENTIALS=storage/app/firebase/firebase-service-account.json

```
Create Firebase Service:
```php

// App/Helpers/FirebaseHelper.php

namespace App\Helpers;

use Google\Auth\Credentials\ServiceAccountCredentials;

use Illuminate\Support\Facades\Http;

use Illuminate\Support\Facades\Log;

class FirebaseHelper

{

    /**

     * Send a push notification using Firebase HTTP v1 API

     */

    public static function sendNotification(string $deviceToken, string $title, string $body)

    {

        $projectId = config('app.firebase-project-id');

        $credentialsPath = base_path(config('app.firebase-credentials'));

        if (!file_exists($credentialsPath)) {

            Log::error('Firebase credentials file not found: ' . $credentialsPath);

            return false;

        }

        try {

            // Authenticate using the Service Account JSON file

            $credentials = new ServiceAccountCredentials(

                ['https://www.googleapis.com/auth/firebase.messaging'],

                $credentialsPath

            );

            $accessToken = $credentials->fetchAuthToken()['access_token'];

            // Send FCM request

            $response = Http::withToken($accessToken)->post(

                "https://fcm.googleapis.com/v1/projects/{$projectId}/messages:send",

                [

                    'message' => [

                        'token' => $deviceToken,

                        'notification' => [

                            'title' => $title,

                            'body' => $body,

                        ],

                        'android' => [

                            'priority' => 'high',

                        ],

                        'apns' => [

                            'headers' => [

                                'apns-priority' => '10',

                            ],

                        ],

                    ],

                ]

            );

            if ($response->failed()) {

                Log::error('FCM Error: ' . $response->body());

                return false;

            }

            Log::info('FCM Notification sent successfully.');

            return true;

        } catch (\Exception $e) {

            Log::error('FCM Exception: ' . $e->getMessage());

            return false;

        }

    }

}

```
5.3 Key Differences
Client-side (Flutter):
– Uses `GoogleService-Info.plist`
– Receives notifications
– Generates FCM tokens
Server-side (Laravel):
– Uses `firebase-service-account.json`
– Sends notifications
– Manages user tokens
Next Steps
With the setup and configuration complete, we’re ready to implement the notification handling logic. Continue to Part 2: Implementation & Advanced Features to learn how to:
– Create the notification service
– Handle foreground and background notifications
– Implement notification interactions
– Add advanced features like custom sounds and rich notifications
– Test implementation
Additional Resources
– [Firebase Console](https://console.firebase.google.com/)
– [Apple Developer Console](https://developer.apple.com/account/)
– [FlutterFire CLI Documentation](https://firebase.flutter.dev/docs/cli/)- [Firebase Cloud Messaging Documentation](https://firebase.google.com/docs/cloud-messaging)