


Following the introductory concepts from Part 1, this section focuses on mastering Flutter’s layout system & advanced widgets, implementing practical state management, and generating production-ready builds.
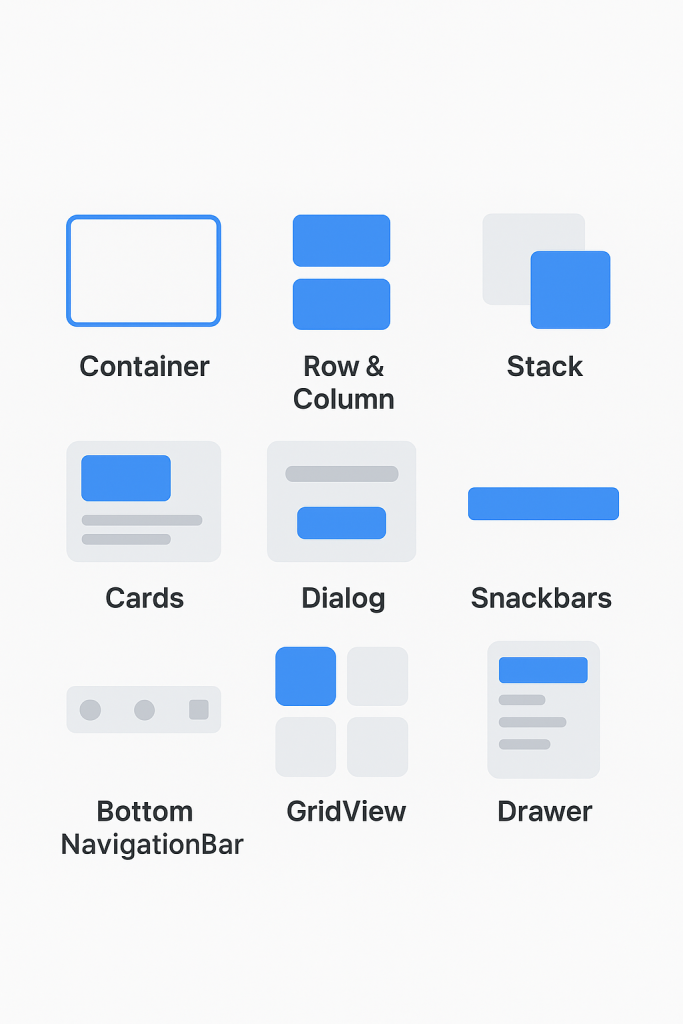
Flutter UI Layout & Advanced Widgets
Container :
Adds padding, margin, borders, and background colors.
Container(
  padding: EdgeInsets.all(16),
  margin: EdgeInsets.symmetric(vertical: 8),
  decoration: BoxDecoration(
    color: Colors.blue.shade50,
    borderRadius: BorderRadius.circular(12),
  ),
  child: Text('Styled Container'),
);
Row & Column :
Combine Row, Column, and Expanded for flexible layouts.
Row(
  mainAxisAlignment: MainAxisAlignment.spaceBetween,
  children: [
    Icon(Icons.home),
    Icon(Icons.search),
    Icon(Icons.settings),
  ],
);
Stack :
Used for overlapping elements (e.g., badges, overlays).
Stack(
  children: [
    Image.asset('assets/banner.jpg'),
    Positioned(
      bottom: 10,
      left: 10,
      child: Text('Overlay Text', style: TextStyle(color: Colors.white)),
    ),
  ],
);
Cards:
Card(
  shape: RoundedRectangleBorder(borderRadius: BorderRadius.circular(12)),
  elevation: 4,
  child: ListTile(
    leading: Icon(Icons.account_circle),
    title: Text('John Doe'),
    subtitle: Text('Flutter Developer'),
  ),
);
Dialog :
showDialog(
  context: context,
  builder: (context) => AlertDialog(
    title: Text('Confirm'),
    content: Text('Are you sure you want to exit?'),
    actions: [
      TextButton(onPressed: () => Navigator.pop(context), child: Text('Cancel')),
      ElevatedButton(onPressed: () {}, child: Text('Yes')),
    ],
  ),
);
Snackbars :
ScaffoldMessenger.of(context).showSnackBar(
  SnackBar(content: Text('Saved successfully!')),
);
BottomNavigationBar :
Great for multi-tab apps.
BottomNavigationBar(
  currentIndex: 0,
  items: const [
    BottomNavigationBarItem(icon: Icon(Icons.home), label: 'Home'),
    BottomNavigationBarItem(icon: Icon(Icons.person), label: 'Profile'),
  ],
);
GridView :
GridView.count(
  crossAxisCount: 2,
  children: List.generate(4, (index) {
    return Card(
      margin: EdgeInsets.all(8),
      child: Center(child: Text('Item $index')),
    );
  }),
);
Drawer:
Drawer is used to create a side navigation panel — a sliding menu that typically appears from the left edge of the screen.
Drawer(
  child: ListView(
    padding: EdgeInsets.zero,
    children: [
      DrawerHeader(
        decoration: BoxDecoration(color: Colors.teal),
        child: Text('Menu', style: TextStyle(color: Colors.white, fontSize: 24)),
      ),
      ListTile(title: Text('Home')),
      ListTile(title: Text('Settings')),
    ],
  ),
);
Step 4: State Management Basics
State management allows apps to respond to user actions. For beginners, use setState():
class CounterApp extends StatefulWidget {
  @override
  State<CounterApp> createState() => _CounterAppState();
}

class _CounterAppState extends State<CounterApp> {
  int _count = 0;

  void _increment() {
    setState(() {
      _count++;
    });
  }

  @override
  Widget build(BuildContext context) {
    return Scaffold(
      appBar: AppBar(title: Text('Counter App')),
      body: Center(child: Text('$_count', style: TextStyle(fontSize: 36))),
      floatingActionButton: FloatingActionButton(
        onPressed: _increment,
        child: Icon(Icons.add),
      ),
    );
  }
}
Step 5: Adding Packages and Assets
Flutter’s ecosystem includes thousands of packages. Example for adding HTTP:
dependencies:
  http: ^1.2.0


// Use it in code:
import 'package:http/http.dart' as http;
final response = await http.get(Uri.parse('https://jsonplaceholder.typicode.com/posts'));


// We can also add assets and fonts via pubspec.yaml:
assets:
  - assets/images/
Step 6: Building and Deploying
For Android: flutter build apk –release
For iOS: flutter build ios –release
Step 6.1: Managing Dependencies and Cleaning Your Build
Before building or deploying your Flutter app, it’s important to manage dependencies correctly and keep your build environment clean.
This ensures your app compiles smoothly on both Android and iOS.
pubspec.yaml — The Heart of Your Project
Every Flutter project includes a pubspec.yaml file. It defines your app’s dependencies, assets, and metadata.
Example:
environment:
  sdk: ">=3.0.0 <4.0.0"

dependencies:
  flutter:
    sdk: flutter
  http: ^1.2.0
  cupertino_icons: ^1.0.6

flutter:
  uses-material-design: true
  assets:
    - assets/images/

// After editing dependencies, run:
flutter pub get
Cleaning the Build
Sometimes old build files cause unexpected errors or slow builds.
Use this to start fresh:
flutter clean
flutter pub get
Preparing for iOS Builds
Flutter’s iOS projects depend on CocoaPods for managing native frameworks.
Before running or archiving your iOS app, execute:
flutter clean
flutter pub get
cd ios
pod repo update
pod install
cd ..
flutter build ios
Explanation:
• flutter clean → removes build artifacts
• flutter pub get → reinstalls all dependencies
• pod repo update → refreshes CocoaPods repo
• pod install → installs iOS-specific pods
• flutter build ios → builds a release-ready app
Best Practice: Run these commands when adding/removing plugins, upgrading Flutter SDK, or facing pod errors.